Year in Review: 2016

As 2016 comes to a close (do I hear a “hallelujah?”), I thought I’d take a look back at what I accomplished this year.

I worked on Corgi Corral

I started off 2016 six months pregnant and working obsessively on my little hobby project. Between January and March, I transformed Corgi Corral from a prototype made out of circles to an actual iOS game with art, basic menus, and sound effects. I also learned a TON about SpriteKit and GameplayKit.

I had a baby!

On March 15, my life changed forever as I welcomed my son Charlie into this world. He’s 9 months old now and blesses me every day with his sweet smile. I spend almost all of my time with him which prevents me from getting much else done, but I know these days are fleeting so I’m trying to soak them in one by one.

Charlie 9 months

I released an app

In early May, I got the itch to learn some new stuff and tackle a coding project. I was annoyed that there was no way to rotate Live Photos in iOS 9, so in the course of a month I put together an app that did just that. LiveRotate only spent a few months on the App Store, (I removed it from sale when iOS 10 was released to the public) but I learned so much in the process of creating it!

I released a sticker pack

After WWDC, I knew I wanted to have an app on the iMessage App Store. Several people suggested I make a corgi sticker pack, so I spent several weeks turning doodles into vectors for Sploot the Corgi. Despite appearing high on the list in searches for “corgi,” Sploot hasn’t sold as well as I’d hoped. On the other hand, I was able to buy a pair of AirPods with the proceeds which is pretty awesome!

Overall, it was a good year for me. In particular, my confidence as an iOS developer increased to a point where I at least feel capable of learning whatever I need to know in order to tackle whatever problem I want to solve. That’s huge for me! Just two years ago I felt way too dumb and inexperienced to ever be a successful developer.

I have several big ideas and goals for 2017, but I’ll save those for a separate post. I hope you all enjoy ringing in the new year!

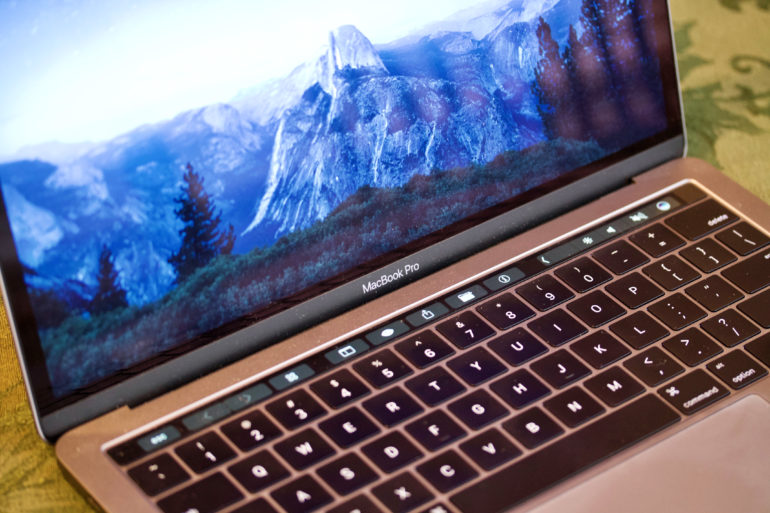
13-inch MacBook Pro with Touch Bar with real world dust

A Review of the 2016 13″ MacBook Pro with Touch Bar

Intro

This isn’t going to be your typical MacBook review because there are plenty of those out there and most of them are very good. This review is for people who don’t give two craps how this year’s model compares to last year’s model and instead want to know how this year’s model compares to their crusty old ThickBook Pro from five years ago because that’s the one they’re upgrading from. Cool? Cool.

Without further ado, here’s how the 13″ MacBook Pro with Touch Bar fares against the mighty 15″ MacBook Pro (Early 2011).

Size and Ports
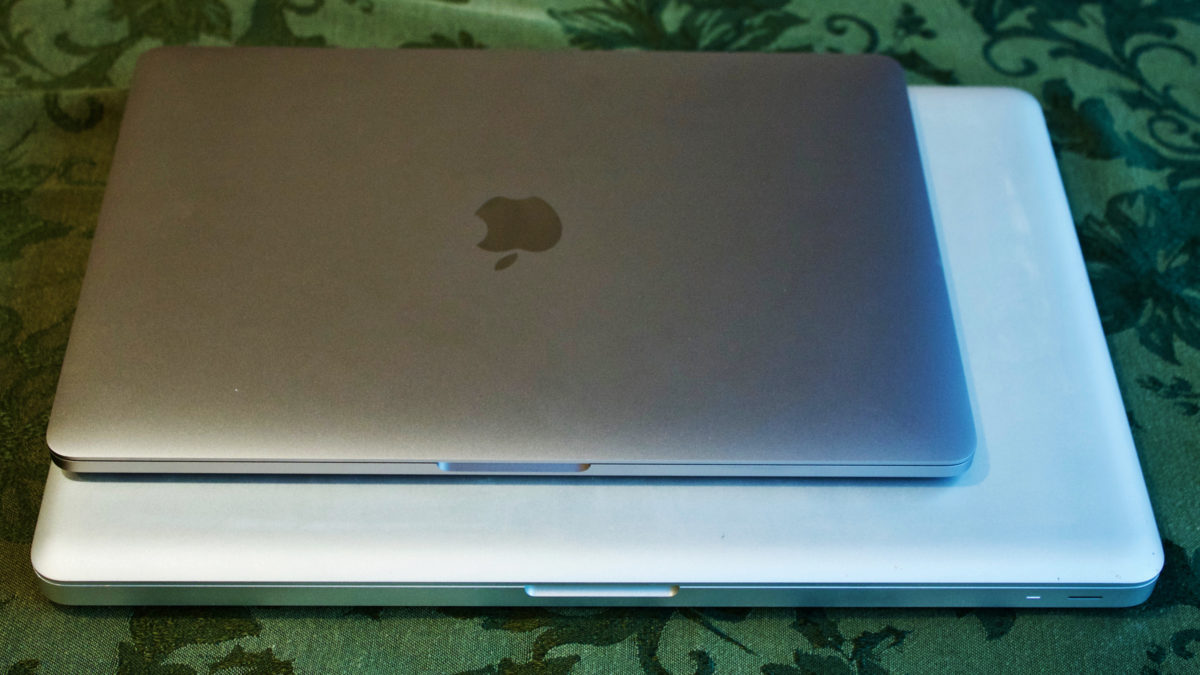
Old and new laptops in a stack on my Christmas tablecloth

I thought my old 15″ MacBook Pro was a laptop. I was wrong. Not only did it frequently burn my lap from running too hot, it was also heavy and annoying to lug anywhere. In contrast, my new MacBook Pro stays cool and feels light as a feather.

The early 2011 15″ MacBook Pro weighed 5.6 pounds. The new 15″ models are only 4 pounds, and the 13″ inch model is actually weightless. Just kidding. But at only 3.02 pounds, it kinda feels like it! I can carry my 9-month-old son Charlie with one hand and my laptop with the other, so it doesn’t get much more portable than that.

My old laptop had a lot of ports, some of which are mysterious to me (a Kensington lock slot? Really?!). My new one has four: Thunderbolt 3, Thunderbolt 3, Thunderbolt 3 and Thunderbolt 3. Oh, and a headphone jack that’s inexplicably on the opposite side of all previous MacBooks.
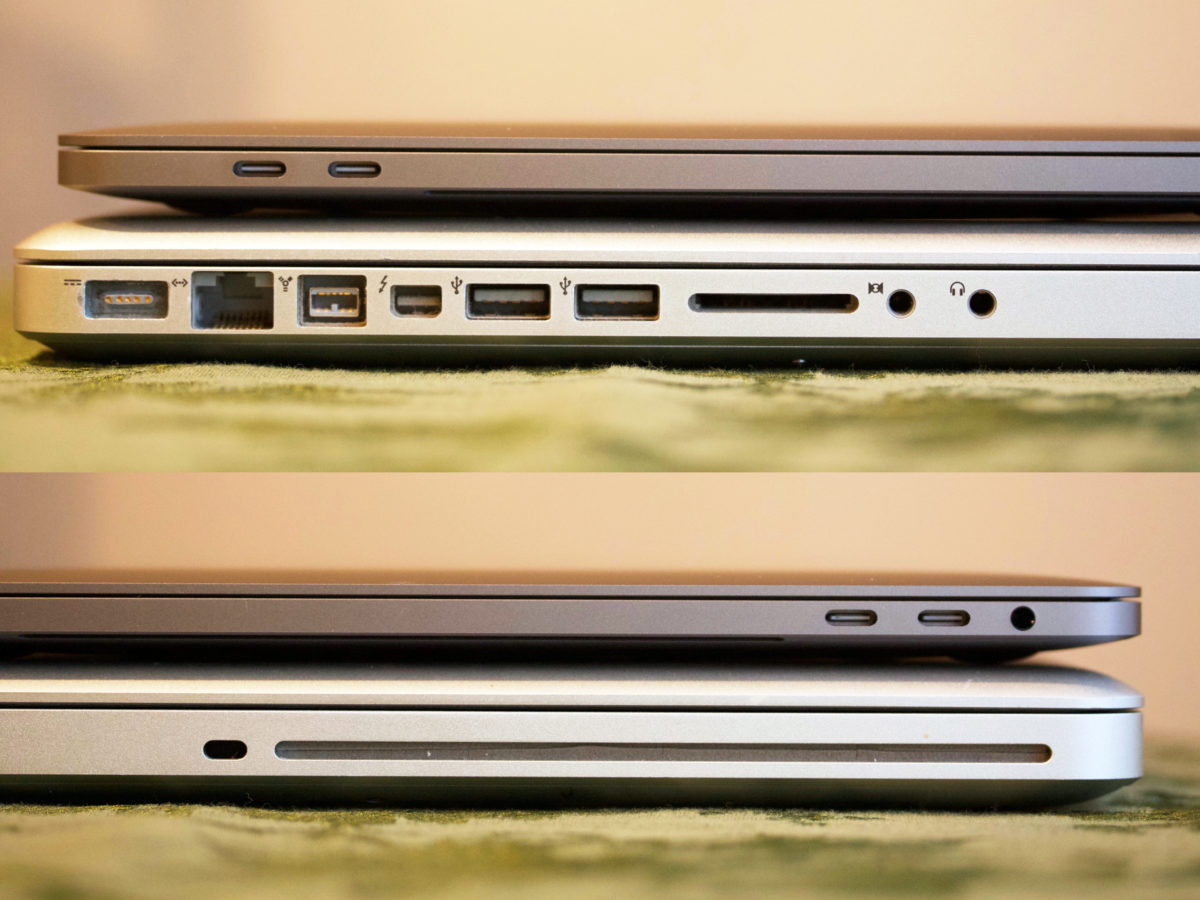
Side view of MacBook ports

So yeah, you’re gonna lose your CD drive, SD card slot, Ethernet port, flimsy old USB 2.0 ports and good ol’ FireWire 800. In exchange, you’re getting four ports that are approximately one zillion times faster at data transfer than what you had. I’d call that a win.

Sure, the loss of MagSafe is a bummer, but being able to plug in the power cable on either side of the computer is really, really convenient.

And honestly, I’m not upset about the adapter situation because the ports on this old MacBook are mostly obsolete, and because I really only need an SD card adapter, and a USB-A adapter for my Time Machine backup.

Display

The 2011 Pro models were the last to have non-Retina displays. If by chance you’ve never seen a Retina display in person yet: it alone is worth upgrading your computer. It’s like taking Claritin, or getting glasses for the first time. Everything is so crisp and clear that you’ll never be able to go back to blurland.

Note, however, that in order to enjoy the full Retina experience on the 2016 MacBooks, you’ll need to change the display’s default scaling.

In addition to being ultra clear, the display is also significantly brighter than the MacBooks of yore and can display many more colors (in technical terms: it has a wider color gamut). It really is beautiful!

Right below the display you’ll see the familiar “MacBook Pro” label in silver lettering except now it’s in the new system font, San Francisco, which looks much nicer in my opinion.

The Touch Bar

I never learned the keyboard shortcut for comparing an edited photo to its original version in Photos. I still don’t know what it is, and probably never will because there’s a button for that on the Touch Bar now.

I like the Touch Bar. I think it’s fun, and I enjoy customizing it in any app that will let me. Like adding stickers to the outside of a laptop or changing its desktop picture, choosing which functions to add to the Touch Bar makes my MacBook feel more personal to me.

I personally know several people who struggle to use computers but who always buy MacBook Pros because they understand that they’re the nicest in the line-up. These users rarely look through an application’s menus, and if they do, they’re afraid to try stuff. I think the Touch Bar helps surface some useful things for both professionals and people who aren’t particularly “good with computers.”

Keyboard and Trackpad

Once you get used to it, the keyboard on this thing will make your old MacBook Pro’s keyboard feel mushy.

The new keyboard is low and tight and snappy. That’s the only way I know to describe it. It feels really good to me, and I don’t like going back to the old one.

Some reviewers have noted (both positively and negatively) that the new keyboard seems louder. That’s true, but you can also type quietly on it. My baby wakes up if he hears a fly buzzing across the room and I was able to type sitting next to his bed without waking him…so there’s that.

The trackpad is roughly as wide as my iPhone 6s is tall (in its case!) which is to say it’s fairly ginormous. Unlike your old MacBook’s trackpad with a physical button at the bottom, you can press down anywhere on this thing. I opened my 15″ Pro the other day to find a file and was super frustrated that I couldn’t press down anywhere…and I’m normally a tap-to-click person! In other words, this trackpad is rad and I love it.

Speed

Despite moving from quad-core to dual-core, this computer can run circles around my old one. It used to take 20 minutes to copy Xcode into my Applications folder on the 2011 MacBook Pro with a 500GB spinning platter hard drive. My new 13″ Pro with Touch Bar has a 1TB SSD and I don’t even remember seeing a loading indicator when I moved Xcode. It’s fast. Everything is fast. Launching applications, compiling code, performing Spotlight and Mail searches, saving and moving files…it’s all fast.

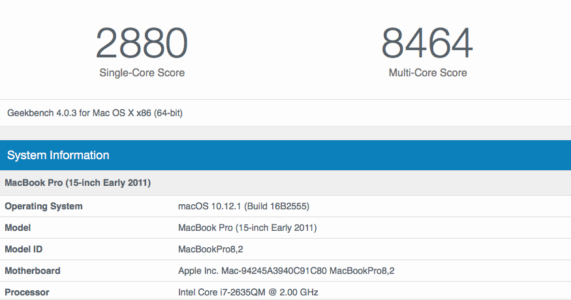
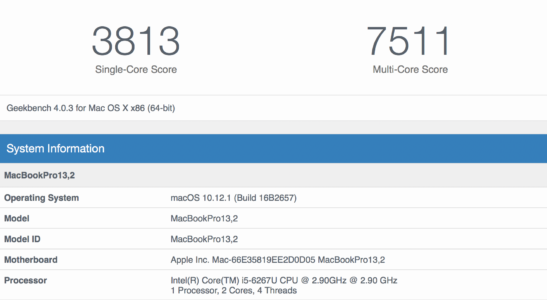
I ran Geekbench 4 on both machines and here were the results (click or tap to enlarge):

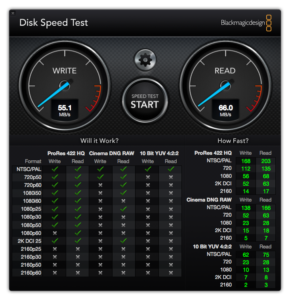
I also ran Blackmagic Disk Speed Test, which is where you can really see a massive difference:

I had upgraded my 15″ Pro from 4GB to 8GB of RAM which is something you can’t really do on these new machines. They’re locked down tight, with an abysmal 1/10 repairability score on iFixit. Still, my new MacBook has 16GB of RAM. Even with Xcode, Simulator, Photoshop, Affinity Designer, Safari, Photos and iTunes open, I still haven’t come close to running out of memory.

Conclusion

If, like me, you’ve been waiting for a very long time to upgrade your MacBook Pro, the new models with Touch Bar are an incredibly vast improvement. And if you also enjoy being an early adopter like I do, you’re going to love playing around with the Touch Bar. I see no compelling reason to hold out for the next iteration of these machines. It’s unlikely that Apple will bring back any legacy ports, and besides the usual speed bump and the possibility of an e-ink keyboard, I’m not sure what else might change (other than the price, which will hopefully drop a bit). In other words, if you’re holding on to a four- to six-year-old machine, now’s the time to open your wallet and get yourself a great new laptop!

A Clean Slate

Last Thursday my shiny new Space Gray MacBook Pro finally arrived at my doorstep and so far, I absolutely love it. This post isn’t about that, though. It’s about setting up a clean install on my Mac for the second time ever.

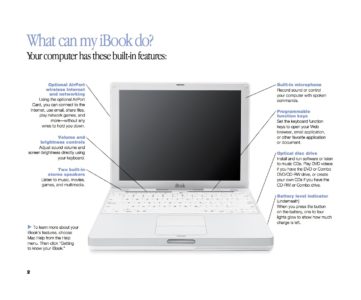
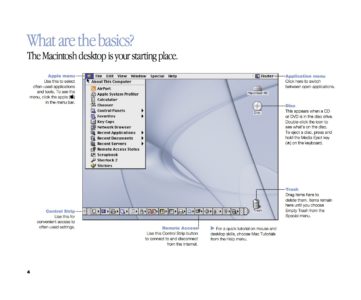
That’s right, I’ve been transferring files from Mac to Mac ever since I got my first iBook in 2002 or 2003 (can’t remember). As proof, here’s a couple pages from one of the welcome guide PDFs that came with that computer:

Where’s Wi-Fi?

Since that’s the way I’ve always rolled, the first thing I did when I opened my new MacBook Pro was connect my Time Machine backup via an Anker USB hub. The restore went surprisingly quickly, and I set about double-checking that everything was in order.

It was, except for one thing: most apps couldn’t establish a network connection. Dropbox wouldn’t connect and Safari Technology Preview wouldn’t load any websites. I spent several moments in despair, thinking I’d received a defective unit and would have to send it back after waiting for so long. Then I tried switching to regular old Safari and…everything worked fine. For some reason, Safari was the only program that was able to access the Internet. I still don’t know what the problem was, but evidently something went awry during the restore. [Update: Rob Poulter suggested that my recent installation of Little Snitch might have something to do with it, and I think he’s probably right.]

So, I wiped my new Mac clean again, re-installed Sierra and set up a new user for the first time in 13-ish years.

That Fresh App Smell

The first thing I did was install my must-have apps and utilities: Dropbox, Homebrew, Xcode, Pages, f.lux, Tweetbot, Textastic, Cyberduck, and Affinity Designer, to name a few. I installed Caffeine only to realize for the first time that it hasn’t been updated in several years and doesn’t even have a Retina-ready menu bar icon. I searched for alternatives and found Amphetamine (Mac App Store link), which is great and gives you a selection of menu bar icons to choose from (I chose the coffee carafe).

Finally it came time to download Photoshop CS6. The download took over an hour on my sad rural internet connection and when I finally ran the installer, it quit with an error every time. So, I got to test out a feature I never thought I’d use: Remote Disc. I found my Photoshop install CD, popped it in my old MacBook, and voila! I was able to install the software. I guess I should have tried that approach first!

Photos Woes

The next thing I wanted to do was move my Photos and Music libraries over. I dug into my last Time Machine backup and transferred the 90GB Photos library file to my new Mac. However, when I opened Photos, things got…weird. Only a few thumbnails appeared, and Photos refused to let me switch on iCloud Photo Library without purchasing more space, because it was planning to re-upload everything. I went ahead and upgraded to the next storage tier hoping that Photos would check with the server, realize it didn’t need to re-upload everything, and calm the heck down. I was wrong.

So, I closed the program, trashed the library, and started over. This time I switched on iCloud Photo Library to begin with. All of my thumbnails appeared, and Photos started downloading all 11,000 photos and 200+ videos from the cloud. Although not ideal, this was the better option for me because my download speed can top out at 10Mbps while my upload speed is only 0.73Mbps. As of right now, 6 days later, there are ~2,500 left to download.

Still, I can’t believe Photos forces users to either re-upload everything or re-download everything if they use iCloud Photo Library. (Wait, yes I can. ?) I’ve read that iCloud is supposed to check for duplicates server-side, but I’m skeptical because it definitely seemed like it was trying to upload files.

The Little Things

I never thought that performing a clean install would make much difference to me. However, here’s a short list of things that are so much better now (note: I could have cleaned all of this up on my old machine; I just hadn’t realized how cluttered everything had gotten):

  • FONTS. Oh my gosh, I had so many freaking fonts installed that I never use and the font menu in all of my apps was so horrible and unmanageable. A clean install fixed that!
  • System Preferences panes. I had icons in System Prefs for devices that I never use anymore, like a 10+ year old Wacom tablet that I’m pretty sure doesn’t even work.
  • Printer drivers and utilities. Back in high school, I’d install whatever drivers and printing/scanning utilities came with my printer. And I went through quite a few printers. Starting fresh helped get rid of whatever unnecessary software remained.

So yeah. If, like me, you’ve never set up a clean user account on a new Mac: I highly recommend it!

The Mac for Me

Last November, I published my wishlist for the 2016 MacBook Pro. Here’s what I wanted:

  1. Lighter. According to Apple, the average weight of the current 15″ MacBook Pro is about 4.49 pounds. Given the company’s unwavering commitment to shrinking things, I think I can reasonably expect that number to drop a bit for next year’s models. Check.
  2. Touch ID. Because why not? Check.
  3. Individually backlit keys. (Check.) I don’t really want to see any changes to the key travel, but those backlit keys on the new MacBook are rad.
  4. Wider color gamut, like the new iMacs. I don’t know if this is technically possible because I have zero knowledge about display technology. However, since MacBook Pros are generally geared toward creative professionals, this would be a change that makes sense. Check.
  5. Different finishes. Gold. Space Gray. Black. White. I don’t really care, as long as it’s not just stupid boring silver. Ugh. Check.
  6. USB-C/Thunderbolt 3 ports. Because if I’m going to be using this laptop for another 5 years, it needs to have the Port of the Future. Or whatever. Super check.

Looks like I’m six for six! (except the key travel did change, but ehhh I’ll get used to it.) Also, one of my “dream big” requests was for a bigger trackpad with Pencil support, so I guess you could even say I got six and a half of my wishes.

I’m really, truly sorry if this MacBook Pro isn’t for you, and I hope Apple will renew its commitment to the rest of the Mac lineup ASAP.

That said, this is absolutely the Macintosh for me.

On iPhone 7/MacBook Pro Compatibility 

I’ve been thinking about how neither the iPhone 7 nor its accompanying headphones can connect to the new MacBook Pro without an adapter. My conclusions are as follows:

  1. Apple wants you to use iCloud and to buy iCloud storage. I’ll come back to this in a moment.

  2. Apple doesn’t really intend for Lightning headphones to be a thing. They included Lightning EarPods in the iPhone 7 box as well as an adapter in order to appease consumers. They assume you either 1) already have some 3.5mm headphones you like or 2) will embrace wireless headphones. So why put a Lightning port in the new MacBooks?

  3. Apple doesn’t want you to charge your devices by connecting them to your computer. I think the 12″ MacBook introduced that idea. Apple wants everyone to charge their stuff via power outlet, probably overnight. I realize the batteries probably don’t last long enough for that to be practical for most people, but there it is.

  4. Apple doesn’t want you to backup your devices using your computer either. They want you to buy iCloud storage, as stated above, and use iCloud backups.

That leaves developers as the only ones who would need to connect their iPhones to their MacBooks, and Apple has no problem selling an extra $25 cord to developers.

So really, putting a Lightning port in the new MacBook Pro makes absolutely no sense, and neither does including a Lightning to Thunderbolt 3 cable.

Viva la (r)evolución

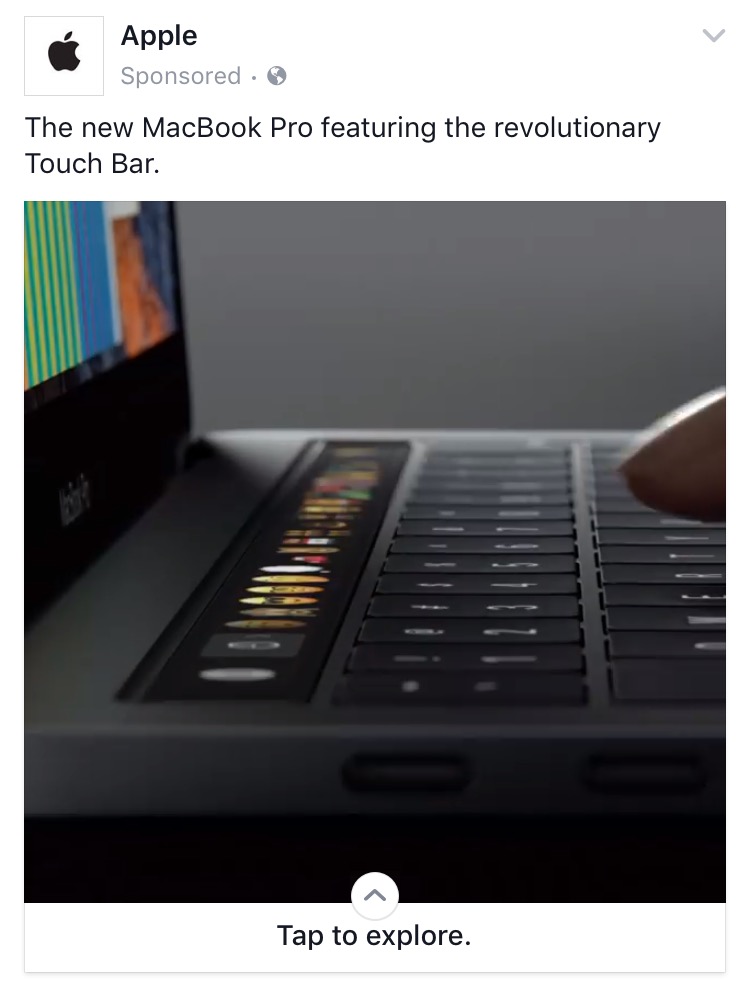
Much to laptop-lovers’ delight, Apple announced three new MacBook Pros yesterday: a 13″ model with a traditional row of function keys and two models, 13″ and 15″, with a “revolutionary Touch Bar.” Now, I don’t have the patience to scrub through the video of the event to see if Phil actually called it revolutionary. And actually, it doesn’t matter because the word is all over their marketing copy.

Apple ad for new MacBook Pro on Facebook

An ad on Facebook for Apple’s new MacBook Pro models.

I agree that the Touch Bar is revolutionary. It’s a dramatic change to what we’re used to. As many have noted, however, the new Touch Bar is also evolutionary: one more change in a long series of tweaks that Apple’s made to the lower half of the clamshell over the past several years. Jony Ive himself told CNET that this was “the beginning of a very interesting direction.”

As I sat mulling over which model and configuration I wanted to buy, I felt slightly uneasy knowing that the Touch Bar was only the first step towards some grand, yet-to-be-realized Jony Ivian vision. How long would I have to wait for him to complete his masterpiece? One year? Two? How about five? The answer, of course, is that it will never be complete. Technology evolves too quickly for anything to remain extremely cool and intensely desirable for more than a year. Design sensibilities fluctuate, new materials are synthesized, and new interaction models are imagined at an incredible rate. In the end, what’s important is that I have a good, functional, reliable tool for doing what I need to do right now.

So, I’ve decided to just embrace the evolution. I will have to buy a hub, as I am a frequent user of the SD card slot and regular USB ports. I’m looking forward to using the new Touch Bar and seeing what developers do with it.

I’ve also decided to move down to a 13″ display. In doing so, I’m going from a computer that weighs 5.6lbs to one that weighs 3lbs, which should feel amazing (and also fit comfortably in my giant diaper bag if necessary!).

“But won’t it suck to have less screen real estate?” my mind asks as I type this entire blog post on my 4.7″ phone display. Sure, Xcode will be a little cramped, but I’ll just have to learn to actually hide various panes when I’m not using them. Full screen will be my friend. And if I decide to get a 5K monitor someday, my little 13″ buddy can handle it.

I saw a lot of snark and negativity on Twitter yesterday, some of which was probably warranted. Regardless, I would encourage Apple lovers to try to separate your desire to see Apple be its best self (and be the perfect, pure source of your futuristic dream devices) from your actual, realistic day-to-day technology needs. If what Apple offers meets your current needs, be glad, and by all means continue to encourage Apple to excel still more. If it doesn’t, then maybe sit back and carefully (prayerfully?) consider switching to something else.

Life is way too short to be grumpy about tech all the time. Embrace the evolution!

Fall Corgi Sticker Pack Update

Sploot the Corgi Fall Promo art

Yesterday Apple approved an update to my Sploot the Corgi sticker pack that includes 5 fun new autumn-themed stickers!

New fall stickers!

Nearly all the stickers in Sploot the Corgi started out with hand-drawn doodles like this:

I then took pictures of my drawings and traced them with the pen tool using Affinity Designer.

I’m planning to add more new stickers (both winter-themed and general-purpose) in the coming months. I’m also considering increasing the price to $1.99 when I hit a certain number of stickers, so grab it early!

Sploot the Corgi Stickers!

I made a sticker pack!

It features a corgi named Sploot (a “sploot” is a common corgi position where both hind legs are splayed out, as illustrated by this helpful Buzzfeed article). There are currently a dozen stickers in the pack and I plan to add more throughout the year.

Sploot the Corgi

I want to talk a little bit about Sploot’s launch.

At some point last Monday night, the iMessage App Store unexpectedly went live and sticker packs became available for purchase for anyone running the iOS 10 beta. I rushed to the store and checked all the featured lists and…nada. Apparently Sploot, like many other apps, was still “Pending an Apple Release.” I admit, I was bummed not to be featured (doesn’t everyone love corgis?!). Looking through those lists, it seems I would have had better luck creating something that was purposefully bad (see: failmoji) than attempting to create something good and falling short of the mark.

Anyway, when my stickers were finally ready for sale the next day, I sent out a couple tweets about them. Meanwhile, other sticker packs were getting featured in round-ups on all my favorite Apple sites. My mistake? Not inviting bloggers to beta-test my sticker pack. Sure, they might not have listed it anyway, but it would have been worth a try! I’ve often talked about how important promotion is; apparently, I can’t take my own advice.

My next mistake became obvious to me as I was spamming my husband and best friend with stickers: my stickers were too big. I mistakenly thought that everyone would use the maximum sticker size of 206×206 points. However, it looks like most stickers are around 130×130 points. So, I resized mine and submitted an update (which was approved yesterday). I also changed the name of the pack from “Sploot” to “Sploot the Corgi” and switched it from the “Emoji & Expressions” category to “Animals and Nature.” I’m hoping these changes will make it easier to find.

In the last week I sold about 80 sticker packs—which is fine, but I was definitely hoping for better!

I think the best thing I can do now is to get working on an update with some seasonal stickers and continue hoping for a feature. And hey, if you’re in need of some cute corgi stickers, you can download Sploot the Corgi from the App Store!

Submitting Stickers Through iTunes Connect

As I sat down to submit my corgi-themed sticker pack last night, I realized I actually had no clue what to do. Apple’s instructions for submitting standalone sticker packs are actually spread across two separate guides (iMessage App Submissions | Sticker Submissions) which added to my confusion.

So, in case you’re as confused as I was, here’s some answers to questions you may have.

What size screenshots do I need to prepare?

You need to prepare two sizes: iPhone 6s Plus (or any of the 5.5″ devices) and 12.9″ iPad Pro.

Where do I upload the screenshots?

You need to add them in two places: at the top of the iTunes Connect record under “App Preview and Screenshots” and farther down under “iMessage App.”

Do I need to add a 1024×1024 square app icon even though Apple doesn’t list it in its Human Interface Guidelines or icon template?

Apparently. There’s a paragraph at the bottom of the iMessage App Submission guide that makes me think it might be possible to view sticker apps on the iOS App Store if you’re not running iOS 10:

if users are on an operating system lower than iOS 10, the link will open the product page on the App Store for iPhone and iPad, and users can download your app from there.

Of course, that might just apply to full iOS apps that include sticker extensions. Who knows? If you’re using the Photoshop template provided by Apple, double click on the “icon” layer under the 58×58 size. It will open as a 1536×1536  square version…you can size that down to 1024×1024 and hit “Save As” (so you won’t mess with the template) to easily fulfill this requirement.

What should I include in the screenshots?

I was a little unsure about this, but decided to go with one shot of my sticker pack in expanded view, and one shot of a sample conversation using my stickers. I took all of my screenshots in the Simulator because I don’t have test devices. I used Photoshop to add profile pictures for my message participants using royalty-free stock photos from Pexels.

What category should I put my sticker pack in?

Why, the Stickers category, of course! From there, you can choose a subcategory or two.

Can I use “stickers” and “iMessage” in my keywords?

Yep! There are some caveats though, as described in the iMessage App Submission guide.

Removing the Headphone Jack: Pros & Cons

I know, I know. This topic has been done to death. However, as we’re two days out from Apple’s “See you on the 7th” event, I thought it’d be fun to list my personal pros and cons of eliminating the headphone jack. 

Cons

  • Without a cable, baby will have one less thing to yank on while nursing. How will he occupy his hands? What will he coat with his drool?!
  • I won’t be able to practice identifying nautical knots several times a day after retrieving my earbuds from my pocket.
  • After I drop my phone in water for the 19th time, I won’t experience the simple joy of digging a single grain of rice out of the headphone jack.

Pros

  • I love remembering to charge things!
  • I’ll no longer be spoiling my ears with high quality audio. Take that, you pompous flaps of cartilage.
  • My phone will finally be thin enough to mince garlic on the go.
  • I love having to triple-check whether my headphones are paired so that sudden noise doesn’t wake Charlie. Aw, who am I kidding? I love it when he wakes up from his naps early!
  • Don’t tell anyone, but I dream of buying dongles. Especially when they’re $29.99. Especially when I’ll probably lose them.
  • Wireless stuff is so so so reliable always. And easy to use in old cars too.

Wow. After reviewing my pro and cons list, I’ve determined that I actually don’t care what happens to the headphone jack. If Apple thinks this will propel us into a perfect future filled with pure, unadulterated Slabs of Glass, then who are we to stand in the way? ?

On Stickers

As I seek to understand more about the popularity of stickers in messaging apps (hint: they’re more than just big emoji!), I thought I’d share some of the interesting articles I’ve come across.

Sticker Culture

  • Stickers: From Japanese craze to global mobile messaging phenomenon by Jon Russell (TNW)

    Despite success in Asia, it appears likely that the appeal of stickers is different in Western markets, where Romanic alphabets are better supported on smartphones and there is less of an emoji/cartoon culture.

  • Why is every messaging app under the sun trying to sell stickers to you? by Jon Russell (TNW)

    Stickers are a frictionless way to monetize a service. By that I mean that they do not immediately disrupt the user experience by serving adverts, forcing video plays or using other forced ‘interactions’ that might serve to draw revenue from sponsors. Stickers are not intrusive and can keep an app priced free.

  • The Elements of Stickers by Connie Chan (Andreessen Horowitz)

    The “trading” element, however, is less about statically collecting and more about dynamically custom-curating one’s personal collection of stickers. These collections also signal one’s “sticker street cred” in Asian messaging apps — you can always tell a newbie or non-tech savvy user by their use of the stock stickers only.

For Developers

For Users

Key Takeaways

  • Designers only need to submit @3x versions of stickers (max size: 618 x 618px, 500KB)
  • PNG files are preferred (even for animated stickers)
  • Pay attention to transparency because your stickers can overlap message bubbles and images in conversations 
  • If you are making stickers that feature a single character, name the sticker pack after the character (or “CharacterName & Friends”)
  • If you want to appeal to Asian users, a quick Google image search of the word “kawaii” wouldn’t hurt
  • Most sticker packs seem to have at least a dozen stickers

Even though I’m not the greatest artist, I’m hoping to have a sticker pack ready for September!

Voicemail Transcription in iOS 10 Beta

I don’t answer my phone much these days. It seems I’m always either holding my sleeping baby, dealing with some sort of unfortunate situation involving his clothes, or creeping around the house in ninja-like silence while he snoozes in his bassinet. There’s no room for noise in my life right now—not when my chances of getting a decent night’s sleep are on the line!

As such, one iOS 10 feature that I haven’t heard much about but that I’ve found very useful is voicemail transcription. For instance, I missed two calls from a friend today. Thanks to voicemail transcription, I found out that the first call was urgent: something had gone wrong in the online class that I helped him set up and he needed me to take a look at it.

The second call came just as Charlie was settling down for his all-important afternoon nap in my arms. This time, I saw that my friend just wanted to tell me a story and that I could call him back when I got a chance.

In both cases, glancing at the transcription was way more convenient than holding the phone to my ear and potentially waking Charlie, who I’m convinced could hear a butterfly flap its wings in Africa.

Another great thing about this feature is that it gives you the ability to provide quick and easy feedback on the quality of the transcription. Below the transcribed paragraph it says something like “How useful was this?” and you can select either “Useful” or “Not useful.” Dead simple, right? I’m sure that prompt will go away when the final version is released but for now I’m grateful for its existence.

It made me wish that Apple would add that same kind of feedback mechanism to all of its AI “suggestions,” even if only in the beta releases. Whether it be suggested apps, contacts, calendar items or locations, I should be given the opportunity to report on their usefulness/relevance. Otherwise, how does Apple get better at this? How do they know where they need to improve? Heck, how do they even know what they’re doing well?

Quick unobtrusive feedback prompts are a great “opt in” way of figuring out the answers to those questions.

Thoughts on Screen Time for Kids

In episode 176 of ATP, Casey, John and Marco discussed their thoughts on “screen time” for kids and whether or not parents should limit the amount of time their kids spend in front of screens of any kind. It caused me to reminisce about my own childhood as well as my [few] experiences with babies and screens, so I thought I’d share those memories here. (They might be kinda boring, so the tl;dr version is: I think screens are A-OK!)

A Childhood of Screens

You might know me as the stay-at-home mom who codes on the farm, but I actually grew up in Bristol, Connecticut. I have very fond memories of our house there; most of them involve me playing outside in our gigantic backyard: finding salamanders under rocks, riding around in my little motorized Jeep, trying to start fires with a magnifying glass…you know, kid stuff.

However, my mom worked a late shift so there was a period of time in the afternoon before my dad got home that I spent with a babysitter—a lovely, middle-aged French Canadian woman named Leona. “Ona” and I watched a LOT of television. I always joke that I learned how to spell by watching Wheel of Fortune. We watched the usual slew of early evening sitcoms (the one I remember most clearly is Roseanne) and I watched my favorite movie, Homeward Bound, at least a million times.

When I was 7, my family moved to Ohio and several things happened: 1) I started at a new school in the middle of second grade, 2) My parents bought me a TV for my room, and 3) I got a Super Nintendo. I had a hard time making friends in Ohio, so I spent lots of time playing Donkey Kong Country, pouring over Nintendo Power magazines, and watching TV. Every night I’d fall asleep watching Nick at Nite, through which I became familiar with many of the shows of my parents’ time: I Love Lucy, The Jeffersons, Mary Tyler Moore, All in the Family, BewitchedHappy Days, and more. In many ways, I think those shows helped me understand how adults related to one another, as well as develop a sense of humor and empathy.

Still, I spent plenty of time not looking at screens. Ohio used to be underwater once upon a time, and my parents and I would visit parks where you could dig for fossils of sea creatures. I also became interested in model trains, so we’d visit train museums and displays around the state.

Two years later, when I was 9, we moved to Nebraska. I spent hours on the family computer, playing with virtual pets, learning HTML, and discovering a vast world of pirated content. I’m pretty sure I played Pokémon on an emulator before my mom bought me my first Game Boy. Like many kids, I was so addicted to Pokémon that I’d sit in the back seat of the car after dark, struggling to play the game by the light of passing streetlights.

Let me tell ya, the late 80s/early 90s were a weird time to grow up because everything was changing so fast and nobody knew what they were doing. As a kid, I sort of straddled the divide between pre-Internet and always-connected—between one screen (the TV) and ubiquitous screens. Since computers and gaming systems were new, and cool, and fun, my parents didn’t think twice about letting me play with them. And now, after all those hours of unrestricted screen time, here I am: a relatively well-functioning human being.

Screens + Babies

Charlie's selfie

Charlie lined this shot up himself!

Charlie is three and a half months old now. He’s very interested in our phones and likes looking at himself via the front-facing camera. There’s a period of time during the day when he refuses to sleep, but is also too cranky/sleepy to play with anything. During that time, he sits on my husband’s lap and watches Fast and Loud, a show about restoring old cars. It’s all just a bunch of blurry blobs to him, yet he’s fascinated by the movement and the bright colors of the hot rods. When the episode is over, he’s usually ready to eat and finally take a nap.

There’s a little baby girl at our church that I watched a few times in the church nursery. She was too shy to interact with the other kids and so I just held her on my lap the whole time while she watched them play. Suddenly she noticed my Apple watch and was transfixed by the honeycomb screen. At a little over a year old, she figured out that if she moved her finger over the surface of the watch, the little app icons would move. That interaction paradigm of touching a screen is incredibly easy for babies to get the hang of. It opens up a world of learning to them that can serve as a good supplement to those all-important hands-on activities.

The Future

I’m not worried about managing screen time with Charlie. In the same way my generation remembers cassettes, record players, rotary phones, and finding the answers to our questions at the public library, our kids may remember smartphones and tablets and 5K displays. In other words, the children who grew up with nothing but screens may very well be the ones who lead us into a future without them (or with fewer of them).

Our kids may be the ones who bring augmented reality to the mainstream. They may laugh at the thought of us staring at our phones all day. They may very well straddle a new divide: between ubiquitous flat pieces of glass and…well, whatever’s next. Heck, in some ways, that screen time might be essential in helping them figure out what should be next.

Sherlocked?

Well my friends, WWDC has come and gone and I, like many of you, am now deeply engrossed in the plethora of new videos, sample projects, and API diffs that Apple has posted.

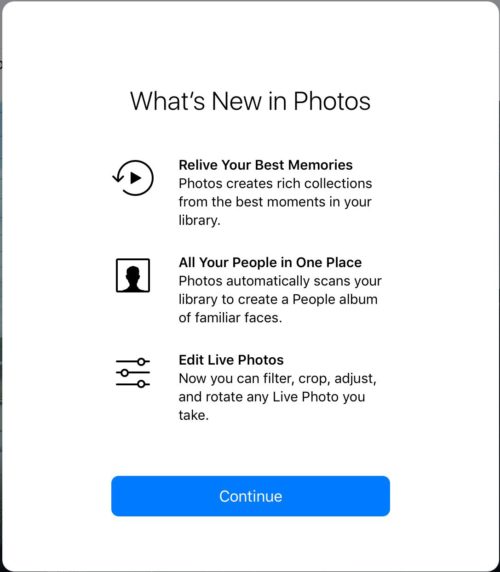
Whether you were actually there or experienced the fun from the comfort of your home, you may have noticed one fateful phrase wedged amongst the many words on the Developer APIs slide: “Live Photo Editing.” And if you didn’t see it there, you may have read about it on the “What’s New in Photos” pop-up in the iOS 10 beta:

What's New in Photos

Screenshot by Casey Liss

So yeah, with iOS 10 you can now rotate, crop, and otherwise adjust Live Photos right in the Photos app—which is awesome and just as it should be!

I hesitate to say that I was sherlocked (which, incidentally, keeps auto-correcting to “shellacked” ?). In order for an app to be sherlocked, I think there has to be some uncertainty involved. In other words, it wasn’t inevitable that Apple would build f.lux-like capabilities into iOS. Nor was it inevitable that Maps would gain the ability to locate your parked car, or that Photos would auto-generate compilations and call them Memories (there is an app by that name with similar functionality). However, I do believe it was inevitable that Apple would expand Live Photo-editing capabilities…the question was just “when?”

Now we know the answer.

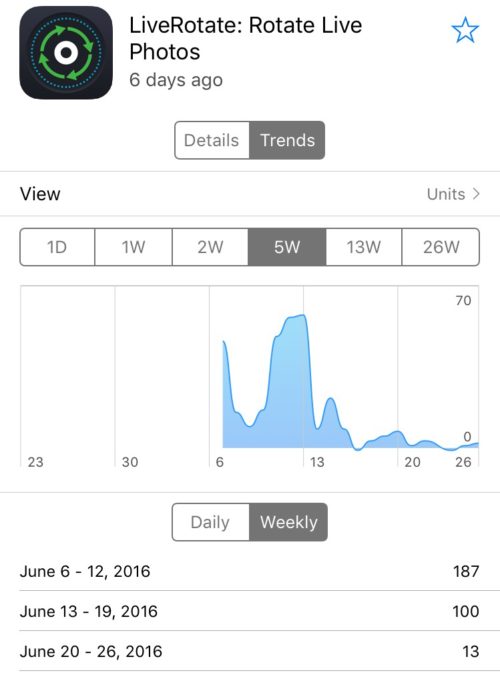
And that’s OK. I learned so much building LiveRotate, and even sold a few copies! From its release on June 7 to today (June 28), LiveRotate was downloaded 304 times. A few people requested refunds, which was expected. I think the app can still provide value to the general public this summer, though when September rolls around I’ll likely remove it from sale.

Overall, I’m very happy with how well it sold, and am feeling more confident than ever about my ability to build apps!

LiveRotate stats

So what’s next for me? Well, I have two ideas for Messages apps: one sticker pack (depending on my drawing abilities) and one app that lets users build their own stickers. I’m also in the process of updating my Bible verse app for watchOS 3. After that, it’s back to Corgi Corral and then onward to some other app ideas that are floating around in my noggin (wow, does anyone use that word anymore?).

Best of luck to all of you with your summer projects! And for those tinkering with the idea of making an app: there’s no better time to get started! ?

The Making of LiveRotate

I thought it might benefit other beginners if I wrote up an overview of how I went about building LiveRotate. (Spoiler alert: there was a lot of Googling involved!)

Starting the Project

When I began, I didn’t have the foggiest idea how PhotoKit worked, and I had all but forgotten how to use collection views, which help you display things in a grid. So, I turned to Apple to see if they had a sample project for the Photos framework and luckily, they do. It has even been updated to “illustrate the use of LivePhoto APIs.” Right on! ?

I then translated almost the entire thing, line by line, into Swift. I’m not joking. I needed the code for the collection view, for displaying a Live Photo with a badge, and for caching thumbnails as you scroll, and that was honestly the bulk of the project (if anybody needs any of that code in Swift, just let me know!). As I translated the code, I learned what each piece did, so that I wouldn’t just be blindly copying things without building up my understanding.

Handling Rotation

Deciding how to rotate the photos was confusing at first because there are two ways you can do it. There are rotation flags that determine how a photo is displayed on a device (but that flag may not be respected by all programs/devices). Or, I could “physically” rotate the bits using some kind of transform. Option B seemed like the right way to go, so I set about learning two new frameworks: Core Graphics for the JPEG part of the Live Photo and AVFoundation for the Quicktime Movie part.

Rotating Photos

There are three types of image-related classes in iOS: UIImage, CGImage, and CIImage. For a beginner, that was SUPER CONFUSING (and still sort of is). Some more searching led me to a category for rotating CIImages by 90 degrees. The Swift equivalent of an Objective C category is an extension. So, I translated that code as follows:

extension CIImage {
    
    func imageRotatedByRadians(radians: CGFloat, imageOrientation: UIImageOrientation) -> CIImage {
        let finalRadians = -radians
        var image = self
        
        let rotation = CGAffineTransformMakeRotation(finalRadians)
        let transformFilter = CIFilter(name: "CIAffineTransform")
        transformFilter!.setValue(image, forKey: "inputImage")
        transformFilter!.setValue(NSValue(CGAffineTransform: rotation), forKey: "inputTransform")
        image = transformFilter!.valueForKey("outputImage") as! CIImage
        
        let extent:CGRect = image.extent
        let translation = CGAffineTransformMakeTranslation(-extent.origin.x, -extent.origin.y)
        transformFilter!.setValue(image, forKey: "inputImage")
        transformFilter!.setValue(NSValue(CGAffineTransform: translation), forKey: "inputTransform")
        image = transformFilter!.valueForKey("outputImage") as! CIImage
        
        return image
    }

Here’s an overview of the photo rotation steps:

  1. Request the photo data using PHAssetResourceManager
  2. Create a CIImage from the data and use the extension to rotate it
  3. Add appropriate metadata (more on this later), convert the resulting image to a JPEG and save it to a temporary location

Rotating Videos

Rotating the video portion of the Live Photo turned out to be much, much trickier. This Technical Q&A from Apple describes which methods actually rotate the buffers and which only set a rotation flag. In order to rotate the video, I needed to use an AVExportSession and apply a transform.

There are 4 orientations that a photo or video may be captured in. I made this convenience method to take the video’s original transform and return information about it.

func orientationFromTransform(t: CGAffineTransform) -> (orientation: String, isPortrait: Bool) {
        var assetOrientation = "Up"
        var isPortrait = false
        if t.a == 0 && t.b == 1.0 && t.c == -1.0 && t.d == 0 {
            assetOrientation = "Right"
            isPortrait = true
        } else if t.a == 0 && t.b == -1.0 && t.c == 1.0 && t.d == 0 {
            assetOrientation = "Left"
            isPortrait = true
        } else if t.a == 1.0 && t.b == 0 && t.c == 0 && t.d == 1.0 {
            assetOrientation = "Up"
        } else if t.a == -1.0 && t.b == 0 && t.c == 0 && t.d == -1.0 {
            assetOrientation = "Down"
        }
        return (assetOrientation, isPortrait)
    }

Each of those 4 orientations could then be potentially rotated 3 different ways: 90 degrees, -90 degrees, and 180 degrees. When you rotate the video, you rotate it around its origin point, which can potentially move the video out of the frame. Therefore you have to apply a translation to get it back to where it’s supposed to be. Derek Lucas (@derekplucas) got me started by creating a Playground that rotated videos on the Mac. I took his translation values and had to tweak them, via trial and error, to get it to work on iOS. Here’s just a small sample of what that hot mess looks like:

var adjustY = videoSize.width
var adjustX = CGFloat(0)

if (radians == CGFloat(-M_PI_2)) {
            if orientation == "Right" || orientation == "Up" {
                adjustX = videoSize.height
                adjustY = 0
            } else if orientation == "Left" {
                adjustX = videoSize.width
                adjustY = -1 * videoSize.width / 4
            } else {
                adjustX = videoSize.width
                adjustY = -1 * videoSize.height / 4
            }
        }

Once rotated, I saved the video to a temporary file.

Live Photo Metadata

You can’t just throw any two photos and videos together and make a Live Photo without doing a little extra work. I found this project by genadyo on GitHub that shows what sort of metadata must be written into the photo and video files in order for them to be paired up correctly.

Basically, you have to do 5 things:

  1. Create an identifier of some kind, assign it to the key kFigAppleMakerNote_AssetIdentifier (which is “17”) in a new dictionary and set that dictionary as the kCGImagePropertyMakerAppleDictionary for your JPEG file.
  2. Create an AVMetaDataItem where the key is “com.apple.quicktime.content.identifier” and the value is the identifier you created in the first step.
  3. Create an AVMetaDataItem where the key is “com.apple.quicktime.still-image-time” and the value is 0. For some reason, this is required in order for iOS to recognize it as a true Live Photo.
  4. Use AVAssetWriter to re-save the video you made using AVExportSession, this time writing in the appropriate metadata. Of course, if you aren’t rotating the video, you could just use AVAssetWriter from start to finish.
  5. Save both the photo and the video to Photos like so (where “fileURLs” is an array containing the two temporary URLs for the photo and video):
     PHPhotoLibrary.sharedPhotoLibrary().performChanges({
                    let request = PHAssetCreationRequest.creationRequestForAsset()
                    
                    request.addResourceWithType(PHAssetResourceType.Photo, fileURL: fileURLs.first! as NSURL, options: photoOptions)
                    request.addResourceWithType(PHAssetResourceType.PairedVideo, fileURL: fileURLs.last! as NSURL, options: videoOptions)
                    
                    }

Conclusion

I started LiveRotate on April 27 and finished it on June 6, so it took just a little over a month to make. I’ve had some good suggestions for improvements to the app and hope to implement those soon. For now, though, my brain can finally break free from “obsessive coding” mode and focus on important things like catching up on household chores and cooking some real food! ?
Edit: 4:35 pm CDT

I forgot to add that I created the app’s icon in Photoshop CS6, and translated it into German, Spanish, Italian and Russian via a hilarious process of changing my phone’s language, opening up apps that had the words/phrases I needed, and screenshotting them. I know—I’m a dang thief!