I admit, I pretty much dove into the app-making process without any clue as to what source control was or why it would be useful to me. And since I didn’t tick the “create git repository” box when I started my Xcode project, I didn’t think I could even add source control to my project. Fortunately, this lovely, easy-to-follow tutorial cleared things up for me!
General
Waiting for Review Day 3: Apple Watch Glances
Note: This is the third entry in a series of posts about writing my first iOS app. The app is currently in review, and until it is rejected or approved, I plan to write something every day about what I’ve learned.
Today I’m going to talk about Glances. On the Apple Watch, Glances are what you see when you are looking at your chosen watch face and swipe up from the bottom of the screen. According to the official Apple Watch Programming Guide:
A glance is a supplemental way for the user to view important information from your app. Not all apps need a glance. A glance provides immediately relevant information in a timely manner.
Since my app’s primary function is to display a randomly selected Bible verse, I was originally hoping that my Glance could do the same thing. Unfortunately, I hit a snag: Glances must be completely static. That means no buttons, and no scrolling. If the selected verse was too long to be displayed on one screen, it would simply be cut off.
Many of the developers I follow on Twitter have remarked that for them, Glances are almost like the Dock on OS X: they provide a quick way to launch a frequently-used app without having to go to the App Screen (or whatever it’s officially called). Because of this, I decided that my Glance should have two characteristics: 1) be visually attractive and 2) display only the reference for the randomly selected verse. Tapping the Glance would then launch the app and display the full text of that verse.
My favorite Glances on my Watch are those that are colorful. The Dark Sky app uses yellow text to indicate how many hours of sunlight are left, or blue bars to indicate rain. The WWDC Glance uses the app’s purple tint color to show the next upcoming event. The heart rate Glance, as expected, is red. Since my app’s primary colors are orange and blue, and the name of the app is “Refining Fire” (more on that tomorrow), I decided to use those two colors along with a simplified logo to differentiate my Glance from others.
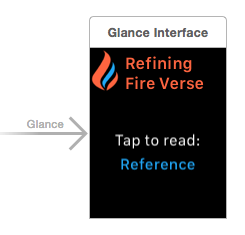
The next thing I had to figure out was how to pass information from the Glance (in this case, the verse reference) to the app. Turns out, it’s super easy to do. In the willActivate() method of my GlanceController, I called updateUserActivity() and passed in the verse reference as the userInfo. The userInfo needs to be a dictionary, so it looked like this: userInfo: ["verse": verse.reference]. Maybe for your app, that userInfo is some kind of UUID for looking up the object that you need.
Next, you have to implement handleUserActivity(userInfo: [NSObject : AnyObject]?) in your initial view controller for your watch app. For my app, I used this method to fetch the verse object that matched the given reference. From this method, you can push any controller that you want using pushControllerWithName. Note that the “name” parameter should be an identifier for the view controller that you can set under Attributes in Interface Builder and the “context” parameter should be whatever information you need to pass to the next view controller. In my case, it was the verse object that I fetched.
The final step was to go to the view controller that would be displaying the verse and update the awakeWithContext(context:) method. Here, I did a simple test for nil: if “context” had something in it (in other words, if the user arrived at that screen by tapping the Glance), the app would use that as its data source. Otherwise, it would fetch a new random verse as usual and display that. Piece of cake!
As a final note: I have no idea whether it’s okay for me to be talking in so much detail about an app that hasn’t been approved and may never be approved. If it’s rejected, that’s fine… I’ll discuss my reaction to it and whether or not I’ll resubmit. :-)
Waiting for Review Day 2: WatchKit & Core Data
Note: This is the second entry in a series of posts about writing my first iOS app. The app is currently in review, and until it is rejected or approved, I plan to write something every day about what I’ve learned.
In my first post, I talked about how I decided to use Core Data to store the verses in my Bible verse app and how I went about seeding that database. The next thing I had to figure out was how in the world my Watch app and iOS app could access the same Core Data model. I learned from a Make & Build tutorial that I needed to create both an App Group and a custom framework that could be shared between the two apps.
After creating a framework, I added two files to it: my Verse class, and a singleton DataManager class that handles all of the Core Data methods. Singletons are still a little confusing to me, so I pretty much just copied the code from this excellent tutorial video. At first I couldn’t figure out why my apps couldn’t seem to “see” anything in the framework, even after linking to it. Then I realized that I forgot to mark everything in the framework as “public.” /facepalm
My DataManager class has three simple methods: a method to fetch all of the verses in the store and place them in an array, a method to fetch only verses marked as a favorite, and a method to select a random verse from the array. Using one of the methods in my WatchKit app was as easy as saying:
var verse:Verse = DataManager.sharedInstance.getRandomVerse(verses)
Tomorrow, I’ll either talk about my app’s visual style (colors, icon, name, etc.), or about Glances and using Handoff.
Building an App from Start to Finish
Start-to-Finish: Building an App
Awesome video from (Underscore) David Smith showing the entire app-making process from idea to App Store submission. I particularly enjoyed his use of “Flight of the Bumblebee” as well as his “dramatic reenactment.”
Waiting for Review Day 1: Creating a pre-populated Core Data database
Guess what? I finally did it. I submitted my first app to the iOS App Store around 2am this morning. It feels so unbelievably great to have actually finished something (well, as much as any 1.0 can be “finished”). As it’s now waiting to be reviewed by someone from the App Store team, I thought I’d write one post every day during the waiting period, describing the app and what I learned from making it. A quick note before I go any further though: it is a Bible verse app, so if you don’t want to hear about that, this would be a good time to stop reading.
The Idea
My first idea for an app was a sort of non-traditional To-Do list app. It seemed like a neat concept and well-suited for a beginner, but after messing around with it for a few months I realized it wasn’t quite coming out the way I’d hoped. I felt slightly discouraged—that is, until I got my Apple Watch on April 24. Because I am a Christian and my faith is very important to me, one of the first things I did upon receiving my watch was look for an app that would allow me to view Bible verses on my wrist.
As of this writing, there are about a dozen watch apps that show up when you search for “bible verses” in the App Store. They fall into roughly two camps: apps that display daily verses, and apps that allow you to read the entire Bible. I wasn’t really looking for either one of those. What I wanted was an app that would allow me to hit “refresh” and see a new verse whenever I wanted, without having to wait for the next day. At first, I thought I could create the whole thing using just a Glance; however, when I learned that Glances must be static and can’t have any buttons, I set out to build a full-fledged app. According to Xcode, I started the project on April 30.
First Steps: Creating a database
I knew I would need a database of verses to pull from, and that I would need to decide what translation(s) to use. Because I didn’t feel like messing with copyright issues, I decided to build my own database using translations that are in the public domain: the World English Bible and King James Version. I pasted the verses into a Google spreadsheet with columns for the verse text, reference, and translation.
Next I needed to figure out how to get that data into my app. I stumbled upon a Ray Wenderlich tutorial that described how to create a command line utility app for OS X that would basically spit out a pre-filled SQLite database for use with Core Data. I liked the idea of shipping my app with the database already populated, so even though the tutorial was old (iOS 5!), I decided to give it a try. Translating it into Swift was surprisingly easy, but then I hit a problem: the tutorial used a JSON file, and all I had was a spreadsheet.
I feel the need to reiterate that I have no computer science/programming background, and know next to nothing about databases. For all I know, it’s probably ridiculously easy to parse a CSV file. However, my tutorial used JSON, and so I did what any self-respecting woman with over 20 years of Microsoft Office experience would do: I did a mail merge. Yes, I literally mail merged my spreadsheet into a Word document so that it matched proper JSON syntax, and then converted it to plaintext and threw a “.json” at the end. If you’re an experienced programmer and that’s the most ridiculous thing you’ve ever read: you’re welcome. ;-)
Anyway, in case any of you want to use that Ray Wenderlich tutorial with Swift, here is what I did:
- I pasted the boilerplate Core Data stack into a new Swift class called “DataManager.”
- After starting a new Xcode project for my iOS app and setting up Core Data, I copied my Core Data class called “Verse” and my .xcdatamodeld file from that project into the command line utility app project.
- I copied my newly created “Verses.json” file into the utility app project.
- Note: there are a couple changes you have to make to the Core Data stack code. You can find those changes in the tutorial.
Here is the code for my main.swift:
import Foundation
import CoreData

var dataManager = DataManager()

// Get JSON data
var err:NSError? = nil;
let jsonURL = NSBundle.mainBundle().URLForResource("Verses", withExtension: "json")
let jsonData = NSData(contentsOfURL: jsonURL!)
let verseArray = NSJSONSerialization.JSONObjectWithData(jsonData!, options: NSJSONReadingOptions.AllowFragments, error: &err) as! NSArray

// Seed Core Data
if let managedObjectContext = dataManager.managedObjectContext {
    for item in verseArray {
        let verseText = item.objectForKey("text") as! String
        let verseReference = item.objectForKey("reference") as! String
        let verseTranslation = item.objectForKey("translation") as! String

        var verse = NSEntityDescription.insertNewObjectForEntityForName("Verse", inManagedObjectContext: managedObjectContext) as! Verse
        verse.text = verseText
        verse.reference = verseReference
        verse.translation = verseTranslation
        verse.isFavorite = false

        var e: NSError?
        if managedObjectContext.save(&e) != true {
            println("insert error: \(e!.localizedDescription)")
        }
    }
}
Tomorrow, I’ll talk about how I set up Core Data so that it could be accessed by my iOS app, Watch extension, and Today View Widget.
Adding a Native Share Button
Add sharing to your Swift app via UIActivityViewController
Music.blogpost
First of all, I’m incredibly excited to announce that Photos.app finally finished syncing my photo library to iCloud, after over two months (March 2 – May 8), leaving me with a “whopping” 7,359 photos and 104 videos. In related news, I’m willing to name my firstborn child after the first person to lay fiber all the way out to my farmhouse.
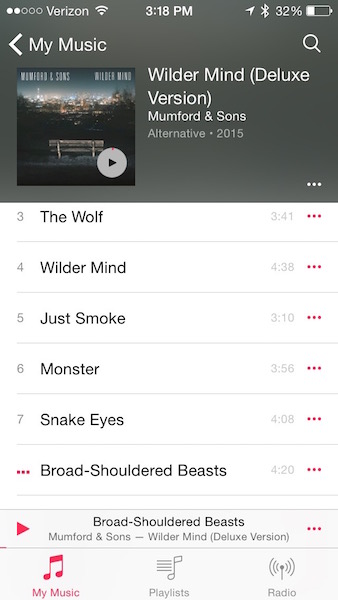 And speaking of redesigned stock apps, I’ve also spent some time fiddling with the new Music app in the iOS 8.4 beta. I’m using the public beta build because even though I have a developer account, I feel slightly safer using the public betas on my primary devices. Anyway, I mostly like what they’ve done with the app so far, even though a few of the Known Issues are preventing me from using it normally (for instance, it’s not working correctly with the Philips head unit in my car). One thing I don’t like, however, is the size of the new mini player.
I’m generally not one to complain about the size of touch targets, but both the size and location of the mini player make it difficult for me to open it quickly. Whereas the “Now Playing” button in the upper right corner of the old music app was isolated from other tap targets, the new mini player is a skinny bar sandwiched tightly between the tab bar and your scrollable list of songs.
I’m not sure what the solution is here. Moving the mini player to the top would help isolate it, but would ruin the aesthetic that Apple is going for, with the color of the album artwork filling up the entire upper part of the screen. It would also make it harder for folks with the larger iPhones to reach the controls. Perhaps they could just increase the height of the bar to 44 points, the height of a normal table view cell.
I’m a big fan of the Beats Music app. I wish Apple would have borrowed its dark interface and––I can’t believe I’m saying this––its hamburger menu. I’d love it if they ditched the tab bar (but kept the “My Music” view as the default) and put playlists, radio, and anything else in a side menu. Then the mini player could sit at the bottom of the screen where it should be, just like the Beats app.
Finally, I wish they’d call it “Beats” instead of “Music.” All of this Music.app and Photos.app business is…odd. What’s next? FileSystem instead of Finder? Search instead of Spotlight? Let’s try to preserve some personality here, Apple!
Update 5/29/15: I’m used to the mini player now. I think it was just a muscle memory issue from using Beats so much! I still think I’d like it better if it sat at the bottom of the app though. :D
Quick Apple Watch Impressions
- I was surprised at how heavy the packaging was for the Sport. The unboxing experience was really fun, and I liked the big plastic case that the watch arrived in.
- I immediately turned off most notifications and also muted the sound. When my watch taps me, it’s going to be for a good reason!
- Siri on the watch has already been useful. For instance, I was outside grilling and wanted to set a timer. I had somehow managed to get marinade all over my hands and left my phone inside, so it was nice to be able to raise my wrist, say, “Hey Siri, set a timer for 5 minutes” and have it just work.
- I like that you can send the animated emoji to people who don’t have the watch, since no one I know has one yet.
- I don’t care at all that it’s “slow.” Seriously, it hasn’t bothered me a bit, and I don’t think the average user will mind either.
- I wore it in the shower and was surprised to find that I could actually use the screen with wet hands. I like to listen to podcasts in the shower, so it was nice to be able to control the playback using Overcast.
Ok, that’s all for now! I’m sure I’ll have more to say as time goes on.
A Rural Photos.app Experience
Let me start by saying that I live on a farm. The best internet service available to me is beamed from the top of a water tower in a nearby town to a pole on the top of our machine shed. In order for it to work, those two things have to be within each other’s line of sight. I get 6 Mbps download speed and, on a good day, 0.73 Mbps upload speed.
All of the photos on my iPhone have been uploaded to iCloud since iOS 8.1 came out in October. I had 6,482 photos and 84 videos in my Aperture library, which I imported to Photos.app when the OS X 10.10.3 Public Beta came out on March 2. None, I repeat none of my iPhone’s photos have downloaded from iCloud into Photos.app yet. I have no idea why. Perhaps it has to finish uploading before it will download anything? At any rate, I probably have about 1,000 photos on my phone that aren’t on my Mac, but that I can see on iCloud.com. Here’s some stats:
- By March 24, after 22 days of uploading, I had 2,863 photos on my iPhone and 39 videos. Keep in mind that about 1,000 photos were already on my iPhone, so only about 1,800 had uploaded.
- By April 2 (a full month), I had 3,336 photos on my iPhone.
- As of today, April 19, there are 4,991 photos on my iPhone and 57 videos (and that’s after I spent a few hours at a place with blazing fast internet).
Oddly, the constant uploading hasn’t seemed to slow down my Internet connection in any noticeable way. I’ve watched Netflix, played games on Xbox Live, downloaded large files…no problem.
My biggest question about the syncing process is: Why aren’t any of the pictures I take on my iPhone showing up on my Mac? I have iCloud Photo Library enabled everywhere. My iPhone photos are showing up on iCloud.com. Why have they not downloaded into my Photos.app library? I imagine that I’m not the only person in this situation. There are lots of people in rural areas with crappy Internet connections who probably have way more photos than I do.
My suggestion to Apple is: show me what’s really going on. Sure, there are “1,956 Items” uploading, but what about how many items need to download? Why can I only pause the process for a day, and not, say, an hour? Why can’t I choose to prioritize the download of my iPhone photos over the upload of my Mac photos? If this keeps up, it could be another month before I can see my latest iPhone photos in my library, assuming that they will, in fact, show up someday.
Otherwise, though, Photos.app is a great 1.0. I look forward to seeing what features Apple will add as time goes on! I’ll post about this again when my Photos library has fully uploaded everything…probably in a couple months. :\
Autoshrinking Text in a Multiline UILabel using Interface Builder
The problem: I wanted to have a fairly tall, multiline UILabel with auto-layout constraints that would shrink its text to fit within its bounds (instead of using sizeToFit and having the label re-size to accommodate the text).
Things I tried: The first thing I did was head over to Stack Overflow and see if anyone else had the same problem. There were lots of posts from 2011, 12 and 13, but nothing super recent; in fact, most of them used methods that are now deprecated. Still, I examined their answers and tried the following:
- Creating a helper function that returned the correct font size based on the text length, label size, and the desired minimum and maximum font sizes using suggestions from here
- From that same thread (towards the bottom), I tried using an extension of UILabel to automatically adjust the font size to fit
- Finally, I hit the official UILabel Class Reference (which I probably should have started with) and found some useful notes, such as this note under the method “adjustsFontSizeToFitWidth”:
In iOS 6 and earlier, this property is effective only when the
<a href="https://developer.apple.com/library/ios/documentation/UIKit/Reference/UILabel_Class/#//apple_ref/occ/instp/UILabel/numberOfLines">numberOfLines</a>property is set to 1.
This led me to wonder what had actually changed post-iOS 6, since everyone on Stack Overflow was still saying that you had to set the numberOfLines property to 1 in order for text shrinking to work, or come up with some convoluted work-around.
The solution: I started tinkering around in Interface Builder, turning various settings on and off to see if anything did the trick.
- I set “Autoshrink” to “Minimum font size.”
- I set the font to my largest desirable font size (20) and set Lines to 10, which was as many lines as would fit in the label at that font size.
- Then, I flipped what turned out to be the magic switch. I changed “Line Breaks” from “Word Wrap” to “Truncate Tail.”
So there you have it, folks. If you want your text to shrink to the size of your multiline label, try setting a specific number of lines (instead of 0, for infinite lines), turn word wrapping off, and make sure Autoshrink is set to either minimum font size or minimum font scale.
Working with UIDatePicker and NSDateFormatter
If all goes well, the app that I’m working on will allow users to schedule local notifications for specific days and times. Since I’ve never worked with dates in iOS before (yep, I’m that much of a beginner), I went searching for some resources that could help me get started. I was hoping to create something like the “Info” screen in the official Reminders app, where users can toggle “Remind me on a day” and set an alarm using a scrolling date picker.
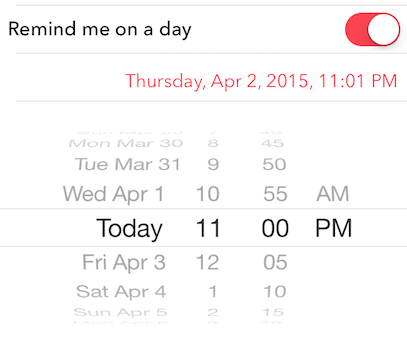
One thing I like about that screen in Reminders is that the table row that displays the date and time formats it in two different ways. When the date picker is closed, the date is abbreviated like so: “Wed, 4/1/2015, 3:00 PM.” When the date picker is expanded, the date changes to a longer format: “Wednesday, Apr 1, 2015, 3:00 PM.”
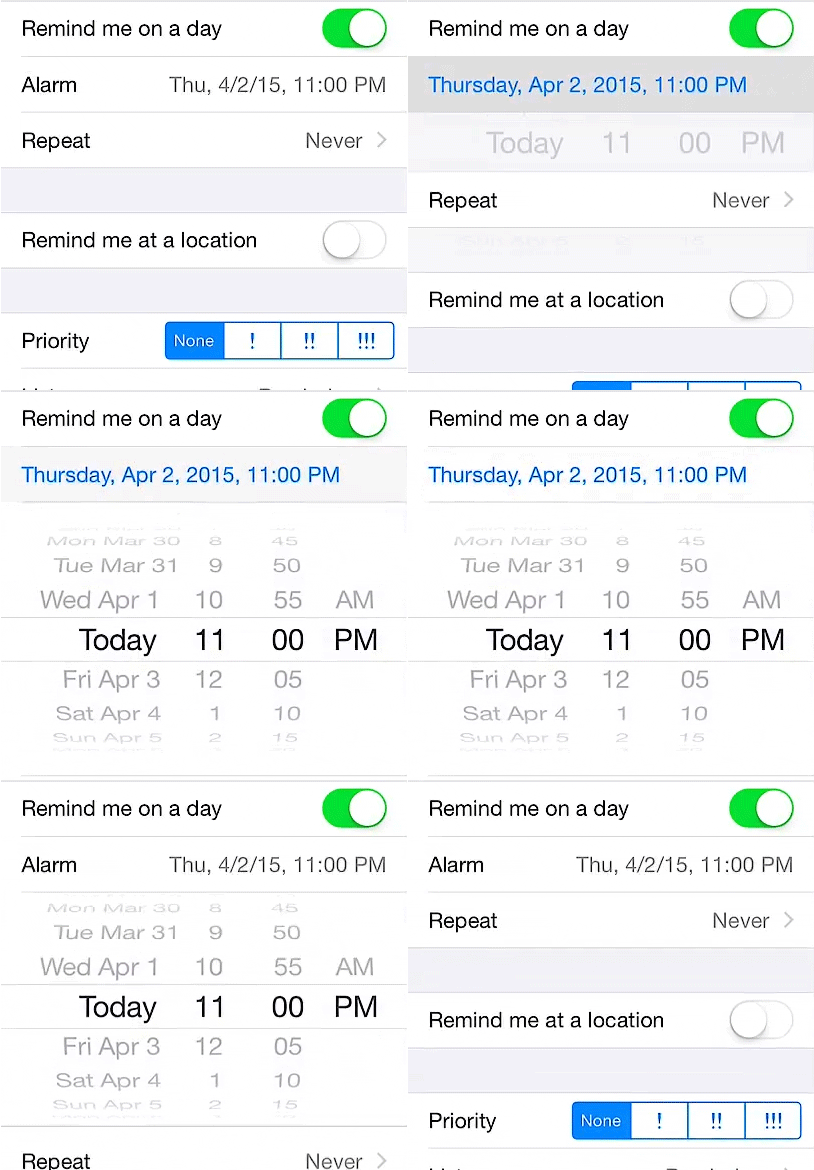
I decided to tackle the date formatting issue first. Fortunately, I stumbled upon a great article that describes exactly how to format dates using NSDateFormatter and Swift. There are four built-in style presets that can apply to both dates and times. Unfortunately, none of presets resembled what I saw in the Reminders app, so I moved on to the “Custom Fixed NSDateFormatter Styles” section. From there, I came up with the following two styles:
let shortDateFormat = NSDateFormatter.dateFormatFromTemplate("EEE, Mddyy, h:mm a", options: 0, locale: NSLocale.currentLocale())
let longDateFormat = NSDateFormatter.dateFormatFromTemplate("EEEE, MMM d, yyyy, h:mm a", options: 0, locale: NSLocale.currentLocale())
The next step was to figure out how to change my dateLabel to display the selected date from the Date Picker. For that, this handy tutorial did the trick. Next, I used a boolean value to determine whether or not the Date Picker was expanded and adjusted the format of the date string accordingly. My result looked almost identical to the Reminders app, which is exactly what I wanted! Why reinvent the wheel?
Diving into a real project that I care about was the best decision I could have made, and I definitely recommend it. You’ll learn so much more!
UICollectionView & Core Data
Good news! I’ve started on my first real app, which I’m hoping to submit to the App Store prior to my birthday in July. The app makes heavy use of a UICollectionView, which can be really cool and also super frustrating. I discovered very quickly that UICollectionView and NSFetchedResultsController do NOT play nice together. Perhaps Apple didn’t anticipate people wanting using Core Data to populate collection views, or they don’t want to take the time to change the API…either way, it presents an interesting problem––one that has received over 1500 views (and I think only like 400 of those are me!).
Since I’ve decided to use Swift for my app, I was hoping for a slightly simpler solution than the answer on that Stack Overflow page, which involves keeping track of each and every change as an NSDictionary inside an NSArray. Fortunately, I found a solution at the very bottom of this thread that did the trick. It’s already in Swift, too, which is a major plus (though I am getting pretty good at translating Obj C to Swift).
Now I’ve run into a problem with the method I’m using to delete multiple selected items from the UICollectionView. However, I think I know what I did wrong, so hopefully I can get that fixed tomorrow and be on my way!
Ballz & Linez: Remembering the Golden Age of Petz Hexing
The year was 1995. A company called PF Magic (said to have stood for “pure f–ing magic”) released a virtual dog simulator for Windows PCs called “Dogz.” I was 8 years old, and had just taken a serious interest in computers (beyond just roaming around the AOL portal and playing game demos, that is). My first encounter with Dogz was actually with the Mac version that came out in 1996. My best friend who lived conveniently across the street from me had it on her family’s computer and it blew. my. mind.
The first version was simple: you could choose from 5 breeds: Scottie, Chihuahua, Bulldog, Setter and Terrier––which was different from Scottie even though Scotties are, in fact, terriers. Your virtual dog existed in a “playpen” which you could customize by selecting one of several very Windows 3.1-like background patterns. Alternatively, you could let your dog roam around your entire desktop, which was like, you know, crazy cool. There was a ball you could throw, a paintbrush so you could paint your dog a different color (what?), food and water dishes, and a few other things like maybe a sneaker? I can’t remember. Anyway, it wound up gaining quite a following and it wasn’t long before a network of online kennel clubs (“Petz rings”…remember webrings? much nostalgia. such gifs) and Petz contests sprung up and people realized that it actually wasn’t that hard to mod the game.
Except that Petz modding (I say “Petz” because by now, PF Magic had begun to expand with Oddballz and Catz) was never called “modding.” It was called hexing, because in the beginning, you had to edit a bunch of hexidecimal code in order to do it. As it turned out, Petz breedz were created from “ballz” and “linez” and all one had to do in order to create a new breed was modify their size, position and color. Of course, it wasn’t entirely that simple and thus hexing grew into an odd sort of art form, where those who were truly excellent at it were elevated to god-like status in the fandom. Most of the Petz websites from that era were hosted on Angelfire and Geocities and are now lost to time, however, a few remain as a testament to the weird, awesome culture of Petz hexing.
Fortunately, one of those is Carolyn’s Creations, which was like, one of the sites to go to for new Petz breedz. Stop for a moment and click on that link––it’s magnificent. You can even choose between frames and no frames (hashtag frames5ever). Carolyn was one of those fandom superstars, and I remember visiting her site to learn how to hex, though I was never successful at it. Carolyn’s breedz ranged from relatively normal variants such as Chow Chows…
…to this incredibly complex Yoshi recreation:
Another incredibly-prolific hexing hero was Supernova (real name Jessica). I mean, just check out this list of breedz…it’s insane. Also, check out this tutorial for a little insight into how hexing was done in the early days, before programs like LNZ Pro were developed to make it easier.
I think one of things that makes Petz hexing worth talking about is that the whole community was comprised largely of women. Women talked about the game, women modded the game, and women built websites about the game. It was a fun, friendly, amazing community to engage with and I honestly haven’t seen anything like it since. In the Petz community, women took a game marketed to them with cute puppies and kittens and modded it to create freaking hellhounds. I feel like there’s a message somewhere in there for game developers today, how about you?
5 Step Blueprint
5 Step Blueprint to Becoming…[an] iOS Developer
Good, solid advice. I struggle with the “don’t get sucked into just aimlessly browsing tutorials or watching iOS talks part”…and I would add “endlessly reading tweets from other developers and listening to Apple-related podcasts” to that as well.
Tiny Victories
Well, I finally managed to complete a little test project: an app that lists all of the restaurants in an airport. It’s not something I can submit to the App Store because I don’t actually have a database of airports and their restaurants, (and learning SQLite to create one sounds like a bit too much trouble at this time) but it was a useful exercise in working with table views. Here are some things that I learned about while creating this project:
- CloudKit (creating record types, adding records from the Dashboard, linking records using CKReferences, and querying for records)
- Creating dependencies between operations
- Auto Layout
- Styling UITableView section headers
- Using UIActivityIndicatorView
- Creating custom cells
- Passing information between view controllers
- Submitting questions on Stack Overflow :D
- Lots of Swift syntax
Here’s what the app’s detail view looked like for the one airport that I added:
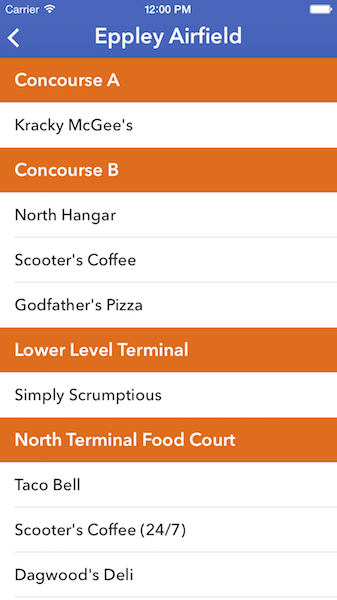
The problem that I ran into earlier was solved by adding a dependency between my two CloudKit queries: the app needed to finish fetching the restaurants before it finished fetching the names of the sections in order for the table view to populate correctly.
I feel pretty good about moving on to AppCoda’s Intermediate Swift book now. So far, learning Swift and iOS development has been just the right mix of frustrating and fun. Here’s hoping it stays that way!

